Now for little Leah's room. Real little since she's still in her mama's belly!Basically, Little Sister wanted to keep the old nursery, which was Wyatt's, and convert it into a little girl's nursery. Who can blame her? Nursery bedding is freakin' outrageously priced! The nursery bedding was pretty gender neutral as it had blues, yellows, reds, pinks, greens and leopard print in it. However, it was heavy on the blue, so we needed to make it more girlie. Mom took on the nursery as her personal project. Yay Mom!Mom and I fell in love with the jungle theme in the bedding. So cute!Alicia, with the help of Stacie, had painted the bedroom pale yellow on the bottom and white (I swear to you that it's a pale blue, but Alicia claims it's white) on the top and put the border up in the middle that matches the bedding.She found the same type of wooden pieces at Walmart in jungle animals as I had for the sports balls (technically, she found them first). Originally, we were going to take some canvases she had bought at Walmart ($3.88 each - 10"x10"), wrap them in gingham and then do this little project that was featured on Martha Stewart. However, time always catches up with us and by the time we were working on the canvases, the last thing we wanted to do was paint something else! Instead, we put Alicia to work on hot glue the cute little wooden animals to the pre-wrapped gingham canvases (thanks to Mom and her staple gun). We hung them over the area where the crib will go (I'll get crib pictures as soon as they are sent to me).
 Another project was painting an existing dresser that Alicia had from her childhood. One lesson learned (as Christie would say): never paint in extreme heat/humidity. First, we painted a couple of coats of Kilz2 primer (latex, baby!) on the dresser and then added 3 layers of the red paint leftover from Wyatt's block wall (multi-tasking paint). It could have taken a third coat, but like I said before, we were DONE painting! It kind of looks like a distressed dresser now. Woo. Anyway, the reason to NOT paint in a garage in extreme heat/humidity is because our paint gooed up a bit on top of the dresser. Luckily, the top of the dresser will be covered mostly with baby diaper paraphenalia (see the picture below...minus NB diapers that are going into the vertical gingham/red basket). I got the red gingham baskets in a set of 3 (one big, two square) at IKEA. I heart IKEA! Of course, no project can go perfectly for us and after getting the drawers back in the dresser, we realized that the trim between the dresser drawers was curved (while the drawers aren't) and we (I) missed painting that part! Darn! Alicia said she'll go back and fix it. I hope so! Also, I didn't get all the cute little knobs on the dresser before I left (time ran out!!), so we hotglued them on for the picture. We also hot glued the leftover butterflies on the dresser because they were TOO CUTE!! Mom got the knobs at a discount store for $7.99. Yup! They are the jungle themed animals! How perfect! And cute!
 For the square mirrors above the dresser(see picture above), we simply took the mirrors, taped them off to make sure no paint got on the mirror, and spray painted the crapola out of them with some red paint Mom had. That Mom...she has lots of stuff hanging around! After they dried, we took the tape off and hot glued the cute butterfly and spirals. We spray painted the spirals with a pale yellow Mom had hanging around. The spirals are similar to the blue spirals in the wallpaper border.All I did in the closet was move the white storage shelves in...they had been sitting in the dresser area and I thought it would be easier to put them in the closet to HIDE stuff instead of keeping them out in the open. We added some cheap storage boxes and that was that! Whew. I love closets.
 I hung the IKEA net in the corner, over where the glider will be placed, to get the stuffed animals off the floor. So many stuffed animals! Now I can see why stuffed animals drove my Mom crazy! They're everywhere!!
 Mom bought the little leopard print lamp shade at Walmart in the clearance section for $3. We just added the red ruffle (that matches the window shade) with what? Hot glue!!
 The roman shade in the window was made by Mom. She got the idea from either an Urban Outfitters catalog or an Anthropologie catalog. Either way, they are cute! She used the bright yellow gingham on one side and a swirlie butterfly print in yellow on a white background on the back side. That way, when it's rolled up, you can see both patterns. She added a line of red rickrack along the top and a line of the red ruffle for extra color (our favorite colors for the room: red and yellow!). She used red satin ribbon for the tie ups. Cute! It's a simple project...all you need is a sewing machine, fabric, thread and the exact dimensions of the window.
 The decals, that match the jungle animals, on the walls I picked up one day at Target while I was just wandering around. I love wandering in Target! You never know what you'll find!!
 Mom took the glider cushions (etc) home with her to recover them. I think she picked a cute animal print in a suede like fabric, but I guess we'll never know until she gets it done! She also took the ottoman home with her...Stay tuned for crib and chair pictures!
So my little sister (technically, my step sister, but some technicalities fall by the wayside whenever you act like real sisters) found out she was pregnant. This will be her second baby (and her last, according to both her and her husband). The first, a boy, will be 3 in December. He's getting so big!! Anyway, she's due late September and lo and behold, it's a girl, even though she swore up and down that she was always going to have boys (due to the track record of her husband's side of the family).In order to make way for Baby #2, it was decided that Baby #2 would move into the current nursery and Baby #1 would be placed in the current guest room.My first dilemna was the fact that Little Sister isn't exactly the most organized person in the world and the room (both) was a total wreck. She did a fairly good job dividing and conquering much of the mess before we got there, but it still needed places to go. I'll get back to that in a bit.I knew that I wanted to do a blue, brown and red palette. I kept seeing cute boyish comforters in blue and brown/khaki stripes and knew it was a popular color. I am a firm believer in visual research and found the exact idea (plagiarism? Who wants to reinvent the wheel?) in a nursery scheme. It wasn't exactly the right colors, but it gave me a good foundation. I then came up with this idea (only confirmed after a trip to get paint) of taking the block scheme and using two shades of brown, two shades of blue (both on the same paint chip) and bright red. First, I painted the focal wall (the intended block wall) white. It was such a relief to paint over the dirtiness of the existing white wall. White paint may seem like an easy color when you are going neutral, but just remember it's like wearing white pants to a barbeque...everything is going to be highlighted in all it's dirty glory when it gets on the white. After the paint dried, I measured off 20" blocks. I started with 24" blocks but those looked too big and 18" blocks looked too small. Since I like to do things 6 - 12 times instead of just once, I ended up remeasuring the blocks about 12 times. I finally came up with a composition that I liked...and that was perfectly centered on the wall. I used my laser level to make sure that the tape (I used a 1.5" painters tape as it would come off nice and smoothly...although where we had to use masking tape when we ran out of painter's tape, some spots are so nice and smooth) was as straight as Carrie possible. (humanly possible for other people).
According to my good buddy, Martha Stewart, after the tape is placed in the appropriate spot on the wall, you should seal the edges of the tape (where you are painting) with an acrylic gloss sealant. I could only find this sealant in spray form and since Little Sister is pregnant, I chose a different product that ended up working just as well. It was some kind of clear glass acrylic. Basically, it just sealed the edge without adding color.After a full day of watching the boys play grown up volleyball, sitting out in the shade, enjoying our independence (in Independence!) painting the closet and remaining three walls the beige color, I made a color drawing of the block wall in order to come up with a pattern (or NOT pattern in this case). I wish I had taken a picture of my drawing: it was on the back of my flight info and was colored with an array of crayons that were not even close to the colors they were representing. After following the pattern, we painted. We had to paint two layers on the beige and light blue, three on the dark blue and brown and 4 on the red because after putting two coats up, we decided the red was too pink and bought a new red. It looked much better after the change.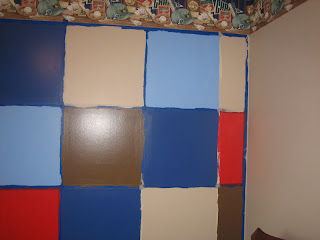
 Once the paint was dry, we carefully peeled off the paint. Of course, there were still some areas that bled under the tape, but overall it was a lot less bleeding than if we hadn't sealed the edges. I was incredibly happy with the overall look...Little Sister and the kid loves it too.
 After finishing up the walls in the bedroom, we tackled various other little projects.We added (hot glue is my bestest friend EVER) some painted wooden pieces that we picked up both at Walmart and Joann's Fabric (already painted) to the dresser and nightstand. Cute!!
 We also painted a 5 hook shelf we found at Joann's Fabric for the rock bottom price of $10.99. It came unfinished so we just used the leftover paint from the walls to do it in two shades and then added the balls with hot glue. Cute!! Johnny had to hang it after I left because it wasn't done when I left (even though Little Sister and I were working up to the very last second before she took me to the airport).
 We wanted to put his big toybox in the closet so that when he is going to sleep at night, he isn't distracted by toys. Because of that, we had Johnny cut some boards down for us and painted them the light blue and hung them in the closet. Perfect for the $3 and $4 crates we bought at Dollar General.
 We found the football toy box at a yard sale for $10! Score! It was fate...right? I mean, how often do you see a football toybox at a yard sale on the weekend you are turning your nephew's room into a sports themed bedroom??
 Little Sister purchased the comforter at Walmart for a mere $25.
 Mom made the curtains one evening with fabric from Joann's. I had my handy dandy 40% off coupon that I receive every few weeks from them so that was a nice deal. The cute football curtain rod was found at Walmart for $10. It went too perfectly with the sports theme to pass up!
 The lamp we bought at the Goodwill for $5. It was a Pooh lamp so we removed the shade and painted the yellow lamp with a nice coat of red spray paint my mother had hanging around. She added leftover fabric from the curtains with hot glue and I added the double bias tape to the edges in the contrasting blue (also with hot glue).
 The letters over the bed I decoupaged a few weeks ago...I will post a "how to" post as soon as I can (I'm working on it, but needed visuals).
 The green square mirrors beside the window were these mirrors from IKEA. We simply spray painted them (make sure to tape off the mirror or you'll be scraping off spray paint for days!) and attached the sports balls with hot glue. Once again.
 The square canvas frames I had painted before the Redux. You can view that entry here.So that's that. I hope you enjoy!
Don't forget to check out Leah's Room Redux too!
 Mom took on the nursery as her personal project. Yay Mom!
 Another project was painting an existing dresser that Alicia had from her childhood. One lesson learned (as Christie would say): never paint in extreme heat/humidity. First, we painted a couple of coats of Kilz2 primer (latex, baby!) on the dresser and then added 3 layers of the red paint leftover from Wyatt's block wall (multi-tasking paint). It could have taken a third coat, but like I said before, we were DONE painting! It kind of looks like a distressed dresser now. Woo. Anyway, the reason to NOT paint in a garage in extreme heat/humidity is because our paint gooed up a bit on top of the dresser. Luckily, the top of the dresser will be covered mostly with baby diaper paraphenalia (see the picture below...minus NB diapers that are going into the vertical gingham/red basket). I got the red gingham baskets in a set of 3 (one big, two square) at IKEA. I heart IKEA! Of course, no project can go perfectly for us and after getting the drawers back in the dresser, we realized that the trim between the dresser drawers was curved (while the drawers aren't) and we (I) missed painting that part! Darn! Alicia said she'll go back and fix it. I hope so! Also, I didn't get all the cute little knobs on the dresser before I left (time ran out!!), so we hotglued them on for the picture. We also hot glued the leftover butterflies on the dresser because they were TOO CUTE!! Mom got the knobs at a discount store for $7.99. Yup! They are the jungle themed animals! How perfect! And cute!
 For the square mirrors above the dresser(see picture above), we simply took the mirrors, taped them off to make sure no paint got on the mirror, and spray painted the crapola out of them with some red paint Mom had. That Mom...she has lots of stuff hanging around! After they dried, we took the tape off and hot glued the cute butterfly and spirals. We spray painted the spirals with a pale yellow Mom had hanging around. The spirals are similar to the blue spirals in the wallpaper border.
 I hung the IKEA net in the corner, over where the glider will be placed, to get the stuffed animals off the floor. So many stuffed animals! Now I can see why stuffed animals drove my Mom crazy! They're everywhere!!
 Mom bought the little leopard print lamp shade at Walmart in the clearance section for $3. We just added the red ruffle (that matches the window shade) with what? Hot glue!!
 The roman shade in the window was made by Mom. She got the idea from either an Urban Outfitters catalog or an Anthropologie catalog. Either way, they are cute! She used the bright yellow gingham on one side and a swirlie butterfly print in yellow on a white background on the back side. That way, when it's rolled up, you can see both patterns. She added a line of red rickrack along the top and a line of the red ruffle for extra color (our favorite colors for the room: red and yellow!). She used red satin ribbon for the tie ups. Cute! It's a simple project...all you need is a sewing machine, fabric, thread and the exact dimensions of the window.
 The decals, that match the jungle animals, on the walls I picked up one day at Target while I was just wandering around. I love wandering in Target! You never know what you'll find!!
 Mom took the glider cushions (etc) home with her to recover them. I think she picked a cute animal print in a suede like fabric, but I guess we'll never know until she gets it done! She also took the ottoman home with her...


