Saturday, March 14, 2009

Super-Easy Peanut Butter Cookies

Just a quickie post about yet another very simple but satisfying recipe.

Last summer when I was moving, I promised a coworker of mine cookies in exchange for his box- and furniture-lifting skills. But not just any cookies, for this particular coworker is very finicky about what makes for a good cookie: not too sweet, not too doughy, no chocolate, etc.. Since I didn't want to be wasting my time making something he would scoff at, I asked him to bring me his mother's cookie recipes - his particular standard for what all cookies should be. He gave me three recipes: molasses, oatmeal raisin, and peanut butter. This recipe is for the latter, which is probably the easiest cookie recipe I've ever made. In fact, when I first saw the ingredient list I thought there must have been a mistake - that is, an omission - in the ingredient list.

Here's what you need for one batch of cookies (makes about two dozen):

1 cup sugar
1 cup peanut butter (your choice as to smooth or chunky)
1 egg
1/2 tsp. vanilla

Only four ingredients! For cookies! No flour, no butter, no nuts, no chips. So simple!

Can this possibly produce something edible? Keep reading...

The only sort of un-fun part of this recipe is what comes next:

Mix.

As we all know, peanut butter is a uniquely sticky, stubborn substance. It doesn't mix particularly well with our own saliva - a phenomenon I once tried to capture in song with a catchy little number called Peanut Butter Stuff Me* - let alone with sugar, egg, and vanilla. If you have the initiative to involve your mixer, then you're home-free. Personally, I hate to drag out the Kitchen Aid for a four-ingredient recipe. What's the point of simplicity if I have to wash my mixer when I'm done? So I opt for good ol' elbow grease.


When you've got the ingredients reasonably well combined, roll the mixture into 1 1/2" balls, and place on an ungreased cookie sheet. (Leave sufficient space between cookie-balls for the cookies to spread as they bake.)

At this point the recipe just says to press with a fork, but if you don't mind getting another dish dirty, my Mom and I recommend pouring a little sugar onto a dish and first dipping your fork in that (you may have to press one cookie first to accumulate enough grease for the sugar to stick to the fork). With your fork nicely sugared-up, press each cookie-ball with your fork in the traditional criss/cross pattern.

Place the cookie sheet in a preheated 350-degree oven, and bake for approximately 10 to 12 minutes, depending on degree on desired crispness, and keeping in mind that cookies will continue to bake (and therefore harden) after they're removed from the oven. I generally start checking them at about eight minutes, because an overdone cookie is not a particularly appealing cookie - to me, at least.


And there you have it. Taste one. They're very yummy - not too sweet - pretty much just solid peanut butter, with a little sugar so you know it's a cookie, and a little egg to hold it all together.
* This was followed by the lesser-known but slightly more tuneful Eatin' Jelly with Mom and Dad. I'll readily admit that at age 5 (or 6?) my song compositions weren't especially complex or clever, but both are catchier, if less didactic, than the annoying Peanut, Peanut Butter - And Jelly song. (Although one of my nephews used to love that song as a little kid, so I hold no grudge against its having made the big-time while my humble offerings remain in virtual obscurity...)

Sunday, March 1, 2009

Now broadcasting from Kansas City

Why hello!

Okay, so I don't actually have any cool projects to post. I have done very little after my move to Missouri. Plus, my camera DIED. So terrible.

Anyway, I can't say that I didn't do ANYTHING. I helped my (step) sister's Mom reorganize and redecorate her basement office. I will post pictures of that as soon as I can get over there with a camera. The only thing I did crafty was to make her four curtain panels from a pair of curtains I bought at Target. We also did a great combination of black with brown and tan. Who says that black and brown don't go together? Ha!

Like I said, pics to follow.

Also, I am moving this Saturday so I can begin to post pics of the new place! It's pretty plain Jane but I am excited to get moved in and all decorated living in my own place in midtown Kansas City! Two minutes from work!! Woo!

Oh. And I bought this fantastic chair at Goodwill for $4.98 and we're hoping to make it even more fantastic in the next few months. I just love mid-century furniture (it's a Baumritter which in 1969 changed its name to the well-known Ethan Allen.)
One more thing, Mom got my funky, swivel chair a makeover from an upholsterer over Christmas, so I'll post pictures of how good it looks (no more kitty scratching post!) when I get it up here!

Until then, see you and miss you all (especially Christie!)!

Man, that wedding soup looks AWESOME.

Sunday, February 22, 2009

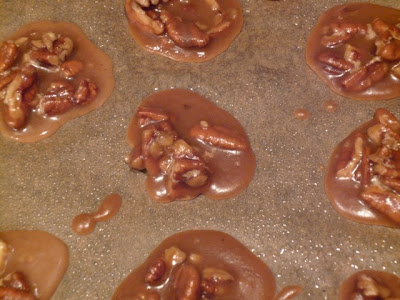
Pralines

Well, Mardi Gras is just a couple days away. I've never been to the various parades and festivities in New Orleans myself, but my Mom being from New Orleans, I grew up playing with boxes of Mardi Gras beads and dubloons. It's probably just as well that my family stopped going down for the parades before I was born, or I could have ended up in a picture like this, but at any rate, an appreciation for this particular holiday has always stuck with me.
When my old roomie Julie and I moved to the Northeast many years back, we were shocked and dismayed to discover that no local bars or restaurants seemed to acknowledge the event. So we began hosting our own mini-Mardi Gras, festooning our dumpy little apartment in purple, green, and gold, and serving up Central Grocery-style muffalettas, crab dip, King Cake, and other Southern delicacies to mildly bewildered coworkers. We got more creative as we went along, at our apex serving up color-coordinated pre-mixed cocktails (margaritas for gold, "leapin' lizards" for green, and I believe hurricanes for purple).

Without an equally-enthused cohost these days, and with considerably less energy myself, I can't say I'm up to all the effort of putting on a whole party, but I like to continue the festivities on a smaller scale. This recipe is from my Mom, and I think it's a safe assumption that she got it from her mom - above, far right - or from her wonderful aunts - above, far left and second (adult) from right. Praline recipes vary considerably - some are hard, some are sticky. These are the kind I grew up with and are therefore just right as far as I'm concerned. I love to break off a piece and let it slowly disintegrate on my tongue into sweet, buttery goodness. They're heavenly, and they bring back fabulous memories, if not of New Orleans, then certainly of our old house in Arkansas.

The best thing about this recipe is how little time it takes, start to finish. Mom used to go into the kitchen and emerge 10 minutes later with a fresh plate of pralines. And when they were gone, she would (sometimes) pop back in and make another batch just as quickly.

The second best thing about this recipe is how basic the ingredients are. If you have a reasonably well-stocked kitchen, you can probably make them right now. Probably at most all you need to go buy is some pecans.

Before we proceed, however, it is vitally important that you know exactly what you're making - which is to say, that you know how to pronounce it. Repeat after me: "PRAH - LEENS". Can you say that? Very good. Make sure, too, to get the accent on the second syllable. You may have heard others refer to a Southern candy called "PRAY - LEENS." I have no idea what this could possibly be, but it sounds dreadful to me. Alright? All set to make some prahleens? Let's get going.

To make approximately 16 pralines, you will need:

1 cup sugar
1/2 cup brown sugar, packed
1/4 cup milk
1 T. butter
1 cup pecan pieces
1 tsp. vanilla
I like the pecan pieces to be fairly large - I break them by hand into the measuring cup, breaking each pecan half once at most, and leaving a few unbroken.

Combine sugars, milk, butter, and pecans in a heavy saucepan.

Bring to a boil.

Boil for 1 1/2 minutes.

Remove from heat.

Add 1 tsp. vanilla.

Beat to a cream, about 3 minutes.

Drop in spoonfulls onto greased wax paper and allow to cool.

Once the process gets going, it moves quickly, so it's important to prepare your wax (or parchment) paper before you start cooking. For a candy recipe this is pretty simple (no exact temperature requirements); however, it's important to time things exactly according to the directions. For me this means resisting the urge to start tidying up while the candy is boiling.As you beat the mixture to a cream, you'll notice - probably after about 2 minutes - that it will start to thicken up quite quickly. The exact moment at which to stop beating and begin dropping is difficult to describe, but in general it's better to guess a bit early (when it still seems runny) than late (when you could end up with one giant praline stuck to the inside of your pan). The best thing to do is to test-drop when it starts to thicken and see whether the candy runs all over the counter or whether it sets up.

The longer the mixture stays in the pan, the more rough & sugary the consistency will be. This means the final pralines you drop may not be the prettiest. I like to drop the last dregs in small, coin-size pieces in between the larger pralines. These make great "tester" pieces for the cook or other "helpers" who happen to be standing by.

If you end up waiting too long to start dropping and the mixture is un-droppable, no worries. Run some water in the pan, wash it out, and start again. Chances are you have enough ingredients to make another batch, right?
Finally, I can't resist telling my personal Praline Disaster Story. Everything was going smoothly; I timed the candy boiling perfectly, and added my teaspoon of vanilla just as I was supposed to. Except, at this point I noticed that the candy suddenly had a less buttery-sugary smell and more of a harsh-minty smell. What happened? As I continued to beat my mixture to a cream, I glanced down at my bottle of vanilla. Except it wasn't a bottle of vanilla. It was a bottle of peppermint extract. What else could I do but continue to beat the candy and eventually drop my weird praline mints onto the paper? Take it from me, this is was not one of those peanut butter/chocolate collision moments.

However, if you do have interest in trying some variations on the classic praline flavor, there's an old Southern Living article - no longer, alas, on their website - with several different flavor possibilities using a slightly different recipe. Some helpful person has transcribed the original article at post #15 on this page.

Monday, February 16, 2009

Italian Wedding Soup

Let's pretend that this whole months-long blogging hiatus never happened and just dive back in, shall we?


When my boyfriend had an unexpected dentist issue/visit the other day, I embarked on a quest to find a new soup recipe for dinner. My existing soup repertoire consisting of vegetarian chili, which isn't really soup, and one semi-failed attempt at potage parmentiere, perhaps this was a worthwhile endeavor regardless of the dental situation. As it was, the potage didn't seem filling enough on its own, and the chili had troubling spiciness issues. (It's also a bit time-consuming, or is if you do all the chopping by hand - something I always do with that recipe because the texture comes out much better that way. Sometime I should post that recipe, I guess.)

Seeking something simple yet filling, I somehow landed on the idea of Italian Wedding Soup. My first go-to recipe site is usually
epicurious because its recipes come from both Gourmet and bon appetit, which I consider to be pretty reliable and kind of more upscale, which I like. Oddly, however, there were no IWS recipes to be found there. Next I checked My Recipes, which accesses recipes from Southern Living, Cooking Light, and Sunset, among others. Again no results that had anything to do with what I consider to be Italian Wedding Soup. Finally, I hit on a recipe from Giada de Laurentiis over at the Food Network site. Now, Giada doesn't look like she's ever eaten so much as one meatball, let alone a bowl-full of them, but who says being a good cook has to go along with being a big eater? Anyway, in her case I assume she inherited a trunk-full of recipes from a healthy-looking nonna-type who's not afraid of a little butter.

This recipe is much closer to the type of soup I had in mind: broth-based (chicken), with leafy greens, meatballs, and a little parmesan.

Ingredients - meatballs
1 small onion, grated
1/3 cup chopped fresh Italian parsley
1 large egg
1 teaspoon minced garlic
1 teaspoon salt
1 slice fresh white bread
, crust trimmed, bread torn into small pieces
1/2 cup grated Parmesan
8 ounces ground beef

8 ounces ground pork

Freshly ground black pepper


Ingredients - soup
12 cups low-sodium chicken broth
1 pound curly endive, coarsely chopped (1 pound of escarole would be a good substitution)
2 large eggs
2 tablespoon freshly grated Parmesan, plus extra for garnish
Salt and freshly ground black pepper


Directions
To make the meatballs: Stir the first 6 ingredients in a large bowl to blend. Stir in the cheese, beef and pork. Using 1 1/2 teaspoons for each, shape the meat mixture into 1-inch-diameter meatballs. Place on a baking sheet.
To make the soup: Bring the broth to a boil in a large pot over medium-high heat. Add the meatballs and curly endive and simmer until the meatballs are cooked through and the curly endive is tender, about 8 minutes. Whisk the eggs and cheese in a medium bowl to blend. Stir the soup in a circular motion. Gradually drizzle the egg mixture into the moving broth, stirring gently with a fork to form thin stands of egg, about 1 minute. Season the soup to taste with salt and pepper.
Ladle the soup into bowls and serve. Finish soup with parmesan cheese if desired.


A few things were unexpected. I hadn't heard of including egg, and I was expecting some sort of pasta. Also, whereas she uses curly endive for her veg, I'm more used to seeing something like kale or spinach. I guess because of these issues, I clicked over to the Comments page that accompanies the recipe. If you're willing to suffer through bad grammar and folksy parlance such as "Hun this is the BEST !!", there's a lot of useful information to be gleaned from the comments page.

For starters, many people seem to have substitued spinach for the curly endive. I had been willing to try for endive or - her suggested substitution - escarole; however, Whole Foods let me down on this one, so I too opted for spinach. Another main comment was using sweet Italian sausage in place of some or all of the recommended ground beef and pork. Again I was willing to follow the recipe here, but finding no ground pork at the store I was happy to know I would be safe using Italian sausage instead. Also regarding the meatballs, many people said they had first browned them before adding them to the broth. I didn't read back through the entire comment log, but I'm guessing that if people are doing this, it's because unbrowned meatballs either fell apart in the broth or were undercooked. Either way, I was happy to take the time to brown them. (In fact, Mike browned them while I got the broth going. He was also helpful rolling the meatballs, which I believe would otherwise be the most time-consuming part of the whole recipe.)

The one change - addition, I guess - I knew I wanted to make was adding some pasta. Not only does this increase the filling-ness factor, but it also jibes better with what I think of as classic IWS. Several commenters recommended a pasta called acini de pepe. I had to
wikipedia the name to determine that it was a type of pasta (as opposed to some type of Italian pepper?), but it's apparently a very small, pepperc0rn-size pasta that's often used in soups. Many other people, however, had used orzo, with which I was familiar. I was all set to go with the acini de pepe but, not finding it at the store, went with the orzo. Given the opportunity I think I'd prefer the acini etc., as its texture would be kind of fun in the soup and it somehow feels more Italian. One of the downsides of adding something extra to a recipe is you don't know exactly when and how to do it. One commenter said she'd used a cup of orzo so, making a half-recipe, I put in a half-cup right after the broth came to a boil and pretty much immediately added the meatballs and spinach. I don't know if this was really a mistake or not. It's definitely true that the orzo was not fully cooked within the 8 minute cooking time for the meatballs and spinach; however, I don't think the meatballs and spinach were particularly hurt by hanging out another 5 minutes waiting for the orzo to cook. I suppose, to do it over again, I could cook the pasta separately and add it at the end, but that creates another pan to clean (you're already adding one for browning the meatballs) and another burner to focus on. I think instead I would let the pasta cook a bit longer next time before adding the rest of the ingredients, although even here you have to be careful, because you certainly don't want to come out with mushy pasta.

As for the egg, I think I could take it or leave it. We happened to have eggs at home, so I didn't mind adding them, but I don't know that I'd buy a carton of eggs purely for their inclusion in the soup.

But, to get to the important thing, this soup was absolutely delicious and also very easy and relatively quick to make! We had enough for leftovers the next day, and it was equally good, if not better. To coin a phrase, Hun this is the best! I definitely plan to make this recipe a few more times while the weather stays chilly up here. However, my modified take on the recipe will be as follows:

Ingredients - meatballs
1 small onion, grated

1/3 cup chopped fresh Italian parsley
1 large egg
1 teaspoon minced garlic
1 teaspoon salt
1 slice fresh white bread, crust trimmed, bread torn into small pieces
1/2 cup grated Parmesan
8 ounces ground beef
8 ounces ground sweet Italian sausage
Freshly ground black pepper

Ingredients - soup
12 cups low-sodium chicken broth

1 pound fresh spinach, coarsely chopped
2 large eggs (optional)
2 tablespoon freshly grated Parmesan, plus extra for garnish
Salt and freshly ground black pepper
1 cup orzo, acini de pepe, or other small pasta

Directions
To make the meatballs: Stir the first 6 ingredients in a large bowl to blend. Stir in the cheese, beef and Italian sausage. Using 1 1/2 teaspoons for each, shape the meat mixture into 1-inch-diameter meatballs.

Heat 2 T oil in a large skillet. Add 2-3 T butter. When fat has melted to coat the pan, add meatballs to pan in a single layer (do half at a time if necessary). Cook until lightly browned, turning as necessary. Remove from pan and set aside.
To make the soup: Bring the broth to a boil in a large pot over medium-high heat. Add the pasta and cook one or two minutes, depending on recommended cooking time. Add the meatballs and spinach and simmer until the meatballs are cooked through, the spinach is tender, and the pasta is cooked to desired consistency, about 8 minutes. Whisk the eggs (if desired) and cheese in a medium bowl to blend. Stir the soup in a circular motion. Gradually drizzle the egg mixture into the moving broth, stirring gently with a fork to form thin stands of egg, about 1 minute. Season the soup to taste with salt and pepper. Ladle the soup into bowls and serve. Finish soup with parmesan cheese if desired.

Wednesday, November 12, 2008

Holiday Turkeys

So I have to admit that the following project was not made by me. Nor Christie. It was made by my coworker, Andrea, who has quite a few crafty tricks up her own sleeves.

I couldn't just let this project go though - they're just too cute!

If you feel the need to make placecard turkeys for your loved ones at your turkey dinner, these turkeys could give you some needed inspiration! (she even made a mini turkey for her tiny nephew!)

Holiday Turkey Project


Enjoy!

Sunday, November 9, 2008

Hummingbird Cake

Yup. It's made from cute little hummingbirds.

Okay. Not really. That's gross.


This cake is actually a kind of spice cake morphed with a fruit cake. Most people, including myself, cringe at the thought of fruit cake. Well, cringe no more people! This cake is super moist, super rich and ultra decadent. It will be a smash hit at
any party. Be sure to bring some milk to wash it down!

Hummingbird Cake:

Ingredients:

3 cups flour
1 tsp. baking soda
1 tsp. salt
2 cups sugar
1 tsp. cinnamon

3 eggs beaten
3/4 cup vegetable oil
1 1/2 tsp. vanilla
1 - 8 ounce crushed pineapple - undrained

1 1/8 cup chopped pecans (save 1/8 cup for frosting sprinkles)

1 3/4 cup mashed bananas (about 2 1/2 bananas)

Directions:
  • Combine first five ingredients in a large bowl and mix.
  • Add (beaten) eggs and oil, stirring until dry ingredients are moistened. Do not beat.
  • Stir in vanilla, pineapple, 1 cup pecans and bananas. Stir well.
  • Pour batter into 3 - 9 inch greased and floured pans. Be sure cake is thick around edges.
  • Bake @ 350 degrees F for 23 - 28 minutes. Insert toothpick until clean. (My cakes were done at 20 minutes so be sure to keep a close eye on them.)
  • Cool in pans for 10 minutes. Removed from pans and allow to cool completely on wire racks.
Cream Cheese Frosting:

Ingredients:

1/2 cup margarine or butter, softened
1 - 8 ounce package cream cheese, softened

1 - 16 ounce package powdered sugar

1 tsp. vanilla


Directions:
  • Cream butter and cream cheese with mixer.
  • Gradually add powdered sugar. Beat until light and fluffy.
  • Add vanilla and beat more.
  • Spread cream cheese frosting between layers and on top and sides of cake. Sprinkle pecans on top.
  • Refrigerate.
(Trying something different with the bullets - not sure if I like it or not...)

Tuesday, October 28, 2008

Halloween Ghost Bags

So for me, Halloween wouldn't be Halloween unless candy was involved. However, I have very few friends who appreciate getting a big bag of candy from me for Halloween (likewise). I came upon the cutest candy bags knowing that my friends would appreciate the sentiment but not the contents.

But who does love candy? The nephews.

I spent this Sunday past making a handful of fun felt bags to fill with goodies and send out to the nephews (three of them, ages nearly 3, nearly 4 and nearly 14) and to my stepbrother (age 14). I know that for the two bigger boys the end product may be a bit childish but the goods inside will be appreciated.

I found the idea for the ghost bag online at Better Homes and Gardens (yup, my fave craftie website). I knew that when I finished my test a couple of weeks ago that I wanted to do SOMETHING not involving studying so I guess this was the project.

I downloaded the template from the website and blew it up until I had the size I wanted. I think I ended up with a 9" x 11" template (it doesn't matter as long as the ghost fits!). My next step was the craft store.
Normally, I would just suggest buying squares of pre-cut felt, but I decided to go with the felt on the bolt because in general, it's a bit stiffer. I got a yard of orange and a yard of white (on sale 50% off!) and then a couple pieces of black and purple in the pre-cut pieces. I felt that purple is a more Halloween-y color than the navy blue that BHG suggests for the "Boo!" letters.

When making multiples of anything, make one first to make sure it works. Then you can have one completely done and just tweak the remaining whatevers.

Ghost Bag:
My first step was to cut out a template for the actual bag. I used the 11x17 sheet of paper the ghost was printed on (I had multiple copies) and measured it out. Remember that 90 degree corners are awesome (not 87 or 92, etc). I used that template (cut out) to just draw an outline with a Sharpie (one of the fine point kind). You can also pin the paper to the felt and cut out the bag that way. Don't forget to cut out two!Next draw an outline of your ghost and cut it out of the white felt. You only need one of these.
Now take one of the bag pieces you have cut out and position the ghost piece where you want it with his entire body on the felt - you will cut off the excess in a bit. Pin it on and sew the entire edges with the sewing machine (if you don't have a sewing machine, you can sew it by hand but it will take forever).The next step is to take the ghost felt rectangle and plain orange felt rectangle and stitch the three corners, leaving the top open. Personally, I chose to stitch the bottom of the bag so the stitch was in the inside of the bag (place the ghost felt and the plain felt outsides facing inside and stitch the bottom. Snip the excess fabric and turn inside out.).
Turn the bag so the outsides are facing out. Sew each side of the bag shut. Using shears or regular scissors, cut the excess of the side of the bag.
Now you will have to draw a line from the ghost handle part out in each direction along the top of the bag and cut the excess orange felt. Make sure that the front and back line up while cutting.

Yay! The bag is done! Now for the decorative elements:

Turn on your tv. This part is a bit time consuming.

Decorative Elements:
Using the letters from your template, cut out two eyes, one mouth, one "B", two "O"s and one exclamation point. Using fabric glue (I'm guessing you could use hot glue except that it might leave trace amounts on the fabric if it leaks through) apply the appropriate letters and eyes and mouth. Use a heavy book for weight and lay it on top of the bag. Leave overnight for best results.

Now you're really done!

Tags:
But, if you are like me, you have multiple bags...so after finishing your bags you may want to make tags.I simply used a cookie cutter to outline a bat shape onto black cardstock (only because I'm lame and like everything to be the same). After cutting out the bat shape, I took a hole punch (well, more like a brad punch because I couldn't find my single hole punch) and made a hole in the corner.

I wrote the recipient's name on one side with a rock star product called (generally) the metallic paint marker. These things are FABULOUS. Except if sniffed in excess, may cause wooziness (please try to avoid sniffing especially if pregnant). They write superbly well and are super shiny! Love it! So anyway, I used that to write the recipient's name and my name on the tag and tied it onto the bag with a black cord ribbon I had lying around. Because I have stuff like that. Lying around.
Now for simplified instructions because I got really wordy up there:
1. Cut out felt (ghost and bags).
2. Sew ghost onto bag.
3. Sew bag together.
4. Cut excess felt off top of bag to align handles with top of bag.
5. Trim with shears.
6. Cut out decorative touches.
7. Glue decorative touches.
8. Label bag.

Friday, September 19, 2008

Say Goodbye to Summer with This Simple Summery Pie

Yes, some kids have been in school for a month already. Yes, I've been wearing a jacket to work for the past week. Yes, the sun is gone by the time I get home at night. But the official first day of fall is still a few days away, believe it or not.

It might not be beach weather anymore, but you still have time to whip up a delicious, summery pie before those turning leaves turn you to thoughts of apple, pumpkin, and pecans.
I got this recipe from Mom (actually her entry in an old Union County Cookbook), and it's almost too simple to be believed. Here's what you will need: 3 egg yolks, one can of sweetened condensed milk, and 1/2 cup key lime juice, plus a graham cracker crust and whipped cream. Now maybe this makes me lazy, but I think any ingredient list that I can count on ONE HAND should win some sort of award.

And the directions are just as simple: beat the yolks, stir in the sweetened condensed milk and lime juice, and pour into the crust. Bake for 10 minutes at 350 degrees, cool, and refrigerate for a couple of hours. Serve with whipped cream. The result is a smooth, tart, summery burst of flavor.
I was inspired to make this pie for the first time a couple weeks ago. Because my local grocery is Whole Foods, I wasn't able to buy a prepared crust, so I pulled out the iphone and quickly found a simple recipe for that as well: 1 1/2 cups crushed graham crackers, 6 tablespoons melted butter, and 1/4 cup sugar. Mix these together and press into a pie plate, then bake 8 to 10 minutes in a 350 degree oven.
Making your own crust adds a nice homey texture to the pie and only adds about 15 minutes to the process. (Always assuming you're working with cooperative grahams; my first attempt involved some frighteningly resilient ones - considering how hard they were to break with a mallet, I don't want to know what they'd do to teeth.)
pre-baked crust, ready for filling
I baked my first pie conventionally - that is, in a conventional oven - but for pie #2 (about a week later - what else are you supposed to do with the rest of that lime juice?) I decided to test out our fabulous countertop oven. Originally I bought the oven for heating up party foods, which it does quite well, but this was my first attempt at using it as a real "oven" oven. The pie came out perfectly - not noticeably different from the first one - and without having to heat up the house by turning on the big oven. Too bad I learned this trick so late into the summer - would've saved some AC bills. Stay tuned for additional tests of the Delonghi oven...
Postscript: To me there is no greater testament to the simplicity of this pie than that, after reading a boastful email from me about pie #1, my friend Russ - admittedly talented at many things but not exactly known as a baker - was inspired to go home and make one of his own, and had made yet another one within a week (again, the leftover lime juice...). If you like lime-y-ness, and you like pie, there's no excuse not to try this yourself.